Showing posts with label Before and After. Show all posts

Thursday, January 9, 2014

the Back Deck

It was still summer and the year 2013, when we worked on the back deck. What month exactly? I've lost complete track. Either way, our back deck was small (roughly 3' deep by 6' long) and falling apart. The neighbors cats were using it as a scratching post, which also didn't help matters. With an almost crawling baby, we decided it was time to design and invest in a new deck.

We spent a few nights designing a new deck, went shopping at Parr Lumber and I convinced the hubs that it would be a lot less maintenance to go with a synthetic wood product. He was totally against this, until we had Ava. Thankfully he came around and admits that less maintenance around the house is a good thing, and more time back on the weekends to doing family things, like hiking! 

The new deck design had to have a few additional elements, as well. It needed to be large enough to put a BBQ on and functionally use, provide additional seating for our mini backyard, and shield the monster air conditioning unit.

With the help of the guys at Parr, we ordered up the materials and enlisted a few very skilled work friends to come help us knock it out in a weekend. I'm forever grateful for their help, as I was more or less on baby watch and let the boys play with all the tools (I honestly, was bummed and hate not being part of the action!) I should also add that the hubs did all the demo himself. The decaying deck took about five minutes, but below it was solid CMU block! I'd like to talk to whoever thought that was a good idea...

Here goes:


Existing Deck Demo, no tools required.
CMU Demo… notice the scratch marks in the two white posts?
More Demo...
Head Supervisor for the Day
Final Product, with one piece of handrail missing (but since installed)


Tuesday, July 9, 2013

the Entry

After returning from Arizona we quickly realized that with a little bean ball - our free time is consumed with wanting to spend every minute with her - especially since we both work full time! SO... we decided to finish the entry and enlisted help. The walls needed to be painted and the trim work needed to be touched up (it was gross & grimy and needed sanding smooth and restaining/ sealing). We did it a bit backwards as we thought we would refinish the trimwork at a later date - so we painted first, did the trim, and then had to touch up the paint... oops!

Our exterior house painter came and did the paint job for us and we found a restoration person to give the trimwork the TLC it needed (this again, was another wild goose chase)... All in all, I couldn't be happier or more thankful to have this work done, done well, and complete.

the Before - The trim is dark, so you can't see how bad it looks in person...
and the walls needed a lot of plaster repair (also not visible)

the Before - A better view of the trim.
You could scratch the black grime off with your fingernail (GROSS!!!)

the After - nice and crisp. All trim and walls are crisp and smooth. 
Details: The trim guys went above and beyond our expectations of sanding to bare wood all the trim work in this area, including the stair landing window. My biggest concern was dust from the sanding but their equipment kept it contained and each night we came home, we couldn't tell that they had been there (other than the progress, of course). We used Michael Light of ML Restoration. Great guy, lives in the neighborhood. We also stained the risers on the stairs, as it was evident that they had previously been stained. We used Miller Paint... and I'd have to look up the color.

shut the Front Door

Hello Friends! Right around Easter we had the front door and side lites removed to be restored. It was a wild goose chase to find someone to restore the door (vs. replace) - and so glad we did. Eric, of Willow Classic Woodworking, and his team did a great job and we couldn't be more pleased.

It's amazing to have a front door that shuts tight, is smooth and sealed, and has hardware in working order. No more loose glass, old cat claw marks from the previous owners or years of black grime! I don't have to worry about whoever comes to the door and knocks on the glass, for fear that before it would come loose and shatter on the floor!

Please pardon the iphone photos - that's the only way you'll see pictures these days!

front door before, with new hardware
(notice all the holes from over the years)

front door, before - mismatched trim

front door after - all touched up
all the holes are gone!

front door after - you can barely see the round patch from the old dead bolt

front door after - working lockset, sanded smooth, weather tight
Details - I took the front door handle to a machine shop to have it repaired as parts had broken off over the years and thus, it stopped working. The front door and side lites were sealed with many coats of a marine grade (boat) finish, so it's protected for years from the sun/ UV. All the glass was caulked into place with a clear silicone to prevent air leakage and weather stripping was installed around the door frame for a better seal.

Friday, May 25, 2012

Oregon Updates, from AZ

This past weekend (May 18th - May 21st) we retreated back to Oregon from the 105 degree heat to head to Dufur, OR... and attend a wedding at the newly renovated Balch Hotel. We stayed at a great B&B (Seven Oaks) in Hood River. I didn't snap a picture of the house or room, but it was a renovated 1926 Bungalow, just our style!!


A few weeks prior to this visit, I was in Portland for work and spent the weekend emptying the upstairs bedrooms onto the sunporch... so we could refinish our hardwood floors in between trips. Thanks to some dear friends and a trusty floor guy, Ben... WA-LA!

FRONT BEDROOM:It definitely feels more complete with the floors. We'll move the furniture back next time we are home. I also ordered a round jute rug for this room. I head to NYC in a few weeks to visit friends and attempt to find light fixtures for this room and the Office at Brooklyn Flea. Keep your fingers crossed! And... I have a Craigslist search out for a Jenny Lind bedframe for this room as well...
Front Bedroom, all nice and shiny

Can't, Not, Take a pic of the feet.
The fir closets and maple bedroom color difference is minimal
OFFICE BEDROOM:
Swanky has been crawling around in the attic running new electrical to this room in his spare time and during the limited weekends we are able to visit this place. Once the electrical is done, we'll patch the plaster and then paint our little hearts out. Then we'll think about furniture and how to lay this space out. 


Office Bedroom, not very bright, but shiny
(Electrical is in process of rewiring...no electricity to this room for now)


Sunday, April 22, 2012

Strip Tease

Get your head out of the gutter! My incredible cousin/ caretaker of the house while we are away, got antsy and started to strip the remaining paint off the stair bannister.

How it looked when we moved in
How it has looked, paint feeling in progress

And now, in it's original full glory... waiting to be stained

Friday, March 23, 2012

The Master Bath (Before & After)

I have realized that I have shared the Master Bedroom, but haven't shared the Master Bath. It was a strange set-up and bathroom that existed before we purchased the home. We new from our first walk through that this would be turned into a private Master Bathroom, and it was only a matter of time.
Turns out the Tub is a clawfoot that got enclosed!
As you can see, having a big window behind the toilet, and having another window off the bathtub are two great things in regards to privacy (sarcasm)... and the color choices were less than awesome. Tile, too. For reference, the shower is in the same location as the bathtub, and toilet didn't change locations.

I'll post some floorplans of what we had to work with, and what we found in another post.

For now, some finished photos...


The marble floor was a splurge that we found at a tile store that accidentally received a shipment that they don't normally sell. Talk about timing, we took it off their hands for a VERY good price. The Marble in the Shower I got from a countertop store - it was scraps from someone's Kitchen Project. Price? Free. They even cut it to the right sizes. The subway tile and woodwork were picked up at local tile and woodworking stores. Bathroom Fixtures are all Kohler and I ordered them through a plumber friend - half price baby! Mirror we found at Ikea is the As-Is Section. Vanity Lights we picked up in the sale bin at Rejuvenation. We were lucky they had two matching. Another score. All in All, for a complete gut job... we did well and finished with the huge help of my cousin, David.

Tuesday, March 6, 2012

the Sunporch (Before & After)

The lower sunporch is directly off the Dining Room and entered through a pair of french doors. When we purchased the house, it was a plywood box enclosed by louvered (70s) windows. It was dusty, the glass had never been cleaned and we used it as an enclosed cut shop while working on trim and other items on the ground floor.

One morning in May 2009 I awoke to my husband dismantling the louvered windows. Thus, the demo began and I joined in on the fun... The neighbors behind us started cheering us on as they saw their backyard view instantly improve with the louvers coming down. I'm sure our house was cheering too,I know I was. It instantly brightened up the Dining Room as light was now able to enter unobstructed.


The sunporch looked like this for about a year, until we finished residing the exterior and had some experts come strip the paint. SO glad we didn't think about replacing these doors with new ones. The fir was in pristine condition and looked brand new.

And once it got painted?
Those are hops that are growing and provide shade during the summer

Ahhh, summer
When we return from AZ, we plan to tile the floor (it's painted plywood right now!), hang some light strings, and possibly make some outdoor curtains to accent the space.

Saturday, February 11, 2012

the Master Bedroom (Before & After)

Hmm... where do I begin? This room had lots of potential. It was a blank slate - no working electrical, no overhead light, a drafty window, french doors to the sunporch and a bathroom on the other side of the wall (can we say... Master Bath?) From our initial walk of the house, we deemed this the Master Bedroom with plans for a Master Suite. I must have subconciously blocked this room from my mind, as looking back I can only find three pictures of our "before demo" pics.
Primary Use: Storage while other rooms were under reno
Love that pink spot? The flat white paint hides all the imperfections
Trim removed, after the new windows were installed.
We demo'd this room Labor Day Weekend, 2009. It took us Friday night - Monday night and we filled an entire 40Yard Dumpster with debri. That's not something we are proud of, but we needed to add electrical to this room, insulate the exterior walls and thus, we took down the lathe and plaster.


A year later... we were wrapping up the project. We were doing the exterior siding that the same time, so I hatched a plan to both motivate and help the pocketbook -  the "Do One Thing a Month Plan" was how it went down. Essentially September was demo, October was electrical, November was insulation, etc. etc. Then the summer hit and my cousin, David, was staying with us for the summer while he had an internship in town. He was our biggest motivator and help when it came to finishing this off. He showed up with a nail gun and between him and Swanky, spent each weekend on trimwork, painting and slaved away on the Master Bathroom. I'm pretty sure David was happy to go back to school so he could relax... I am forever indebted to him for his help.

I also couldn't be more in heaven with the tranquility of the room and to be in a finished space. We moved into the bedroom almost two years to the date of when we moved into the house. Furniture and styling? ...Someday...
Framed blueprints of my Grandfather's from the Navy. Handmade pillows by me.
DIY Curtains... Someday we'll get to purchasing dressers...

Tuesday, February 7, 2012

the Front Bedroom (Before & After)

This bedroom had ONE working electrical outlet... some large holes in the walls from the previous owners, drafty aluminum windows and missing trim. Truly minor in the grand scheme of things - So we picked it as our master when we moved in.

An extension cord later, a carpet to cover up the rough maple flooring and some pictures to hide the walls - we were set!

Evidence of occupation, missing trim and new windows (hooray!)
It wasn't until we finished the Master Suite that we moved out of this room, and started on the electrical, trim and painting. The hubs gets full credit for the completion of this room. He slaved away in Spring 2011 while I was traveling, out of town, consistently for work.
The underlying theme of this room is nature/ organics. I envision a headboard (I sense a DIY project), our gray bedding in AZ will go well in here, and a nice large area rug. I'm also toying with paiting a darker green above the picture rail, leaving the ceiling white. I think it would help make the room pop, subtly.


We are lucky to have such large bedrooms. At some point soon we'll move all our furniture off the 2nd floor to refinish the maple in one fell swoop. You can't tell from the pictures, but the maple is rough, and when sanded/ refinished it lightens up to be more like beech in color.

Thursday, February 2, 2012

the Dining Room (Before & After)

I tend to bundle the Living Room and the Dining Room together since our Craftsman has them defined only by two columns, and not adjacent rooms. We also renovated them together as we think of them often as one room. The time consuming part of the Dining Room Reno? Trim touch up.

We had the horizontal ledges of the buffet fully sanded down to bare fir, restained them and did a thick layer of lacquer over the top to protect them from wear & tear, and the sunlight.


The original oak hardwood flooring needed some serious refinishing, walls had some plaster repair, a few electrical outlets were added from the opposite side during the kitchen renovation, and this girl (yes, me) sanded, stained and refinished all the woodwork.
A semi-blurry progress shot. Floors have been refinished.
The Dining Room is wide and short in depth, which limited our table purchase to something long... very long... which leads to a fun time in searching for table cloths to fit! Minor problems, considering we are able to easily seat 10-12 in this room and not feel crowded. We opted for a bench on one side of the table to change things up, keep it a bit casual and allow us the flexibility to squeeze more seating in if required. It's also handy for parties, it tucks away under the table nicely when the table is used as a buffet.
Updated Lighting, A large table... and eventually we'll buy enough matching chairs

Looking at the buffet, whose lighting will soon be updated.

Hello Flash, View into the Living Room.
Future plans include putting paneling in below the picture rail (it's minimal and not in any of the pictures above), and I'm working on some artwork here in AZ to set along the rails that ties in an Oregon theme that we started for this room. 

Wednesday, January 25, 2012

the Living Room (Before & After)

Oh Living Room, you had us at hello. The space is WIDE open, which is unusual for a craftsman of this time period. Our first steps into the space and I was looking beyond the grity floors and damanged walls and woodwork. The natrual light filled the space, offseting the dark (unpainted!!) woodwork. As you can see, the wood floors and trim needed some serious TLC. And the classy, basic brass light fixtures... Hey, at least this room had some working electrical outlets and lights!
Note the contractors redoing the foundation were using this as a good place to store their materials.

Can you believe there is original oak flooring hiding below the dust and dirt!? And those awesome aluminum windows... that leaked not just air, but also water.

The room takes up almost half of the ground floor, sharing it with the adjacent open Dining Room, Kitchen and Entry.

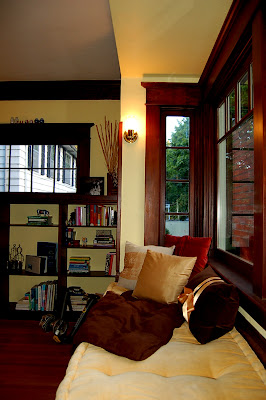
Thanks to the Winter Blasts (#1, 2, and 3) of 2008 - We had 10 days off of work in a row, which allowed us to sand, stain and refinish all the woodwork, have the floors sanded, and allow us to paint and patch the walls. Most of the work was done ourselves, with some help of a trim carpenter friend in between jobs. In Spring 2009 we took advantage of Energy Star Tax credits and had the (3) window seat windows replaced with wood windows to help with our energy bill as well as the character of the home. I handstained all the wood on the windows to match the surrounding trim as well as sealed it.

All of our furniture, books, pillows and family antiques barely fill this space and the styling of the room is an evolution as we finish other rooms around the house, disperse our belongings and upgrade from "college grade" furniture.
 One of these days, this light will be replaced...
but either way, this is still one of my favorite spots in the house.
At dusk, lights on... and a future coffee table purchase
Front windows replaced and someday the two lights, too.